


UDP Load Balancing with NLB and PTSD
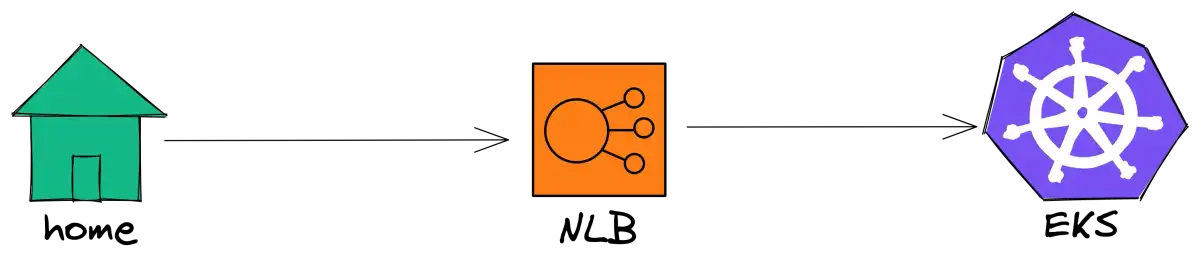
Load balance UDP packets with NLB and EKS
Storytime
Lastly, I had a chance to do full-time DevOps and, basically, my task was to search for solutions on how we can load balance a UDP application. What does the UDP application do? It handles UDP packets. 😄 Joke aside, we have IoT devices that are sending statuses about electricity consumption, electricity generation by solar panels, etc., and we want to show users real-time data about those. What about PTSD? So, before this, I didn’t have any experience with NLB, and with Kubernetes, I had only the basics. And, what can I say? It was a hell of a journey, mostly because I had to figure out a lot of things by myself. It’s not so easy to debug stuff in the DevOps world compared to debugging code, for example. Also, whenever I ran into an error, there were not so many StackOverflow questions about it, and mostly zero solutions for my problems 😅. That’s why I thought it would be helpful to share my experience with anyone who wants to load balance UDP packets with more or less than zero DevOps knowledge.
EKS
So, in order to begin deploying our application, we will first need Kubernetes. You can use a locally-based solution like Kind, but eventually, you will need AWS EKS because of the load balancer. Therefore, I will create an EKS cluster from the beginning.
Prerequisite
tools: aws-cli, eksctl, kubectl helm
Let’s create an EKS with eksctl
eksctl create cluster --name udp --region eu-central-1 --nodes 2 --node-type t2.medium --asg-accessThis will take a lot of time, between 10–30 min. in the meantime let me explain what the parameters do. The region where the EKS will be created is defined by the ‘region’ parameter, the number of worker nodes is defined by the ‘nodes’ parameter, and the EC2 instance type on which the EKS runs is defined by the ‘node-type’ parameter (it is recommended to use an m5.large, but for testing purposes, a t2.medium can be used). The ‘asg-access’ parameter allows for cluster autoscaling.
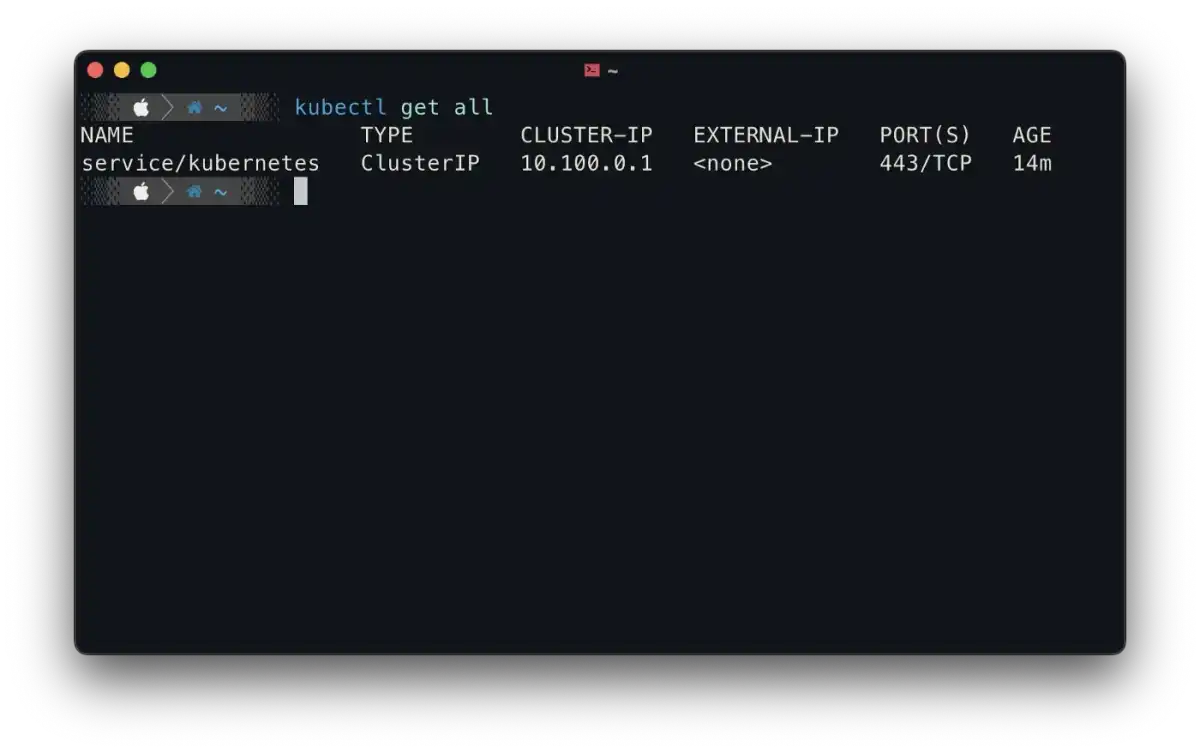
If the eks is created then the kubectl should be configured automatically, you can test this by running the command kubectl get all
Now you will need to install the Amazon VPC CNI plugin. There is a way to do it from the command line interface, but it is simpler to do it from the website.
You will need to go to your Cluster and select the add-ons tab
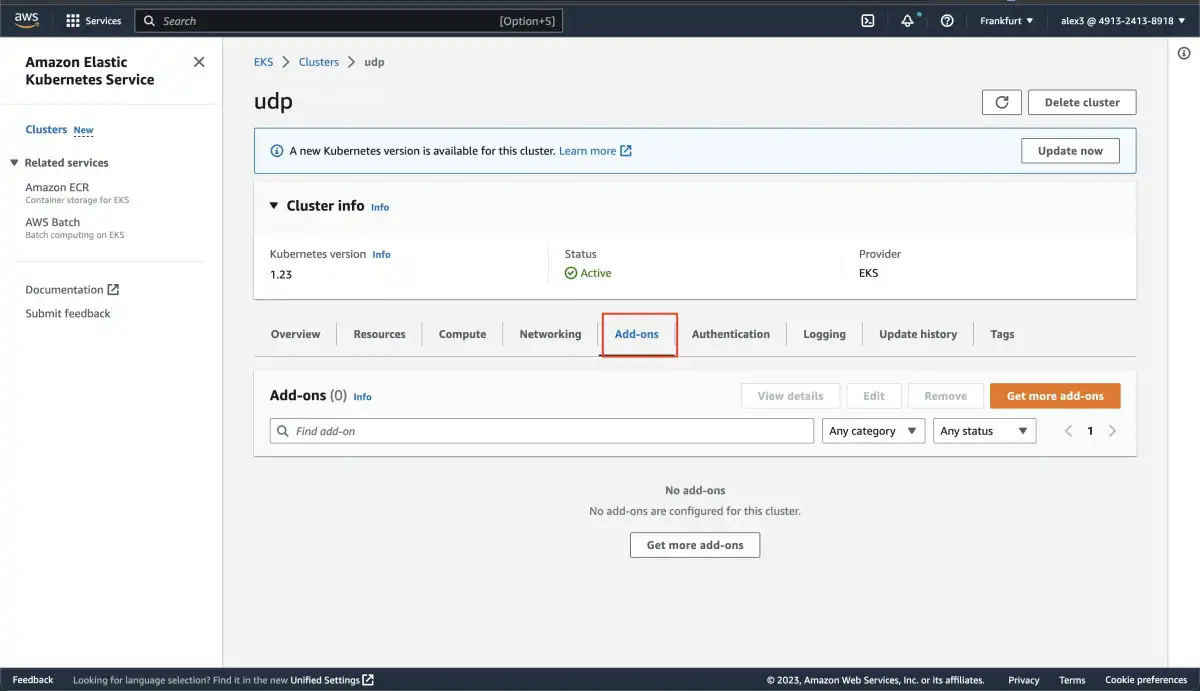
there you need to press the Get more add-ons button, where you can install the Amazon VPC CNI addon.
NLB Ingress controller
We also need to install the NLB ingress controller. This is what runs inside EKS and creates the connection between the AWS load balancer target groups and the Kubernetes pods.
Every instruction can be found here.
First, let’s get the IAM Policy for the EU regions
curl -O https://raw.githubusercontent.com/kubernetes-sigs/aws-load-balancer-controller/v2.4.4/docs/install/iam_policy.jsonThen let’s create it in aws
aws iam create-policy \
    --policy-name AWSLoadBalancerControllerIAMPolicy \
    --policy-document file://iam_policy.json
Now we will create the iamserviceaccount but before that, we need to associate the IAM OIDC provider with cluster
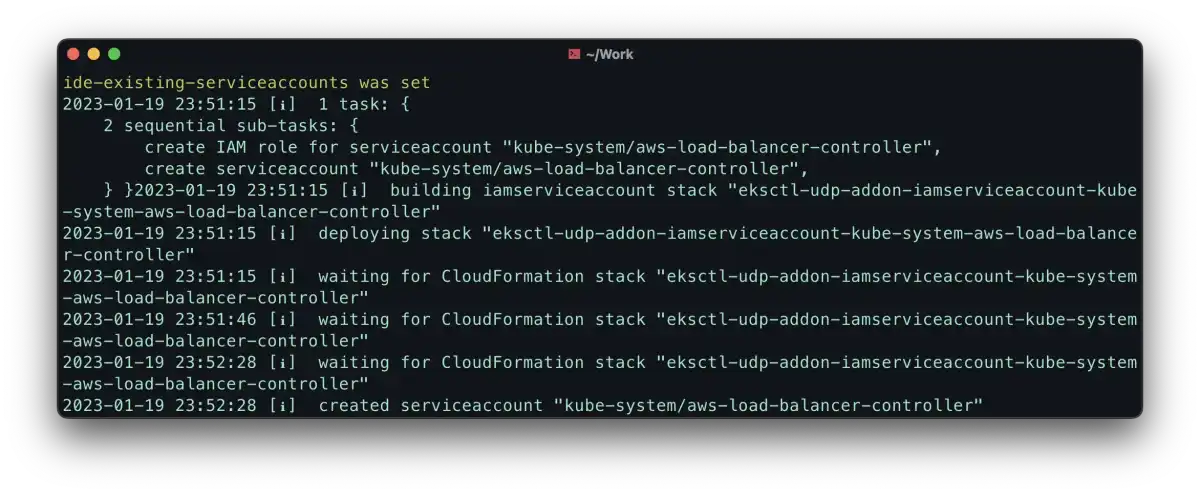
eksctl utils associate-iam-oidc-provider --region=eu-central-1 --cluster=udp --approveeksctl create iamserviceaccount \
--cluster=udp \
--namespace=kube-system \
--name=aws-load-balancer-controller \
--role-name AmazonEKSLoadBalancerControllerRole \
--attach-policy-arn=arn:aws:iam::111122223333:policy/AWSLoadBalancerControllerIAMPolicy \
--approve --region=eu-central-1- here you need to give your cluster name with the —-cluster parameter
- next, you will need to change the iam account id to your own in the —-attach policy-arn parameter, … :aws:iam::
:policy … - you may also need to specify the region with the —-region=
parameter if the cluster is not found
you should see something like this:
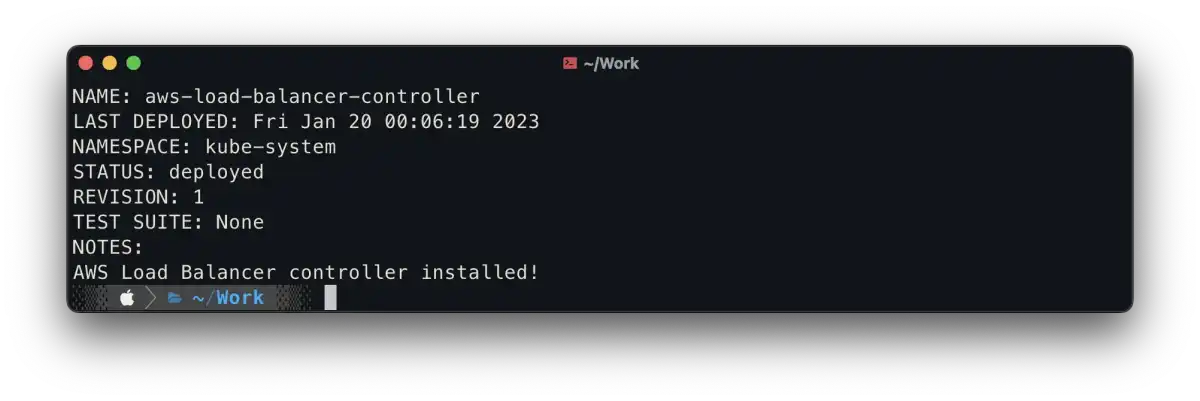
Finally, let’s install the NLB Ingress Controller, we will install this with helm
helm repo add eks https://aws.github.io/eks-chartshelm repo updatehelm install aws-load-balancer-controller eks/aws-load-balancer-controller \
-n kube-system \
--set clusterName=udp \
--set serviceAccount.create=false \
--set serviceAccount.name=aws-load-balancer-controllerthe result should look like something this:
also, you can check if everything is installed by running the command in CLI:
kubectl get all -n kube-systemand you should see running aws-load-balancer-controller pods:

tipp: you can check the logs of the aws-load-balancer-controller pods when you deploy a service, there you should see information about creating the AWS nlb resources
Application
In order to test our solution, we need a UDP application that will be simple. It will only log UDP packets, and we will use Node.JS 🚀
Our app structure will look like this:

udp.ts this is the logic where we handle the UDP packets
import { createSocket, RemoteInfo } from 'dgram'

const onMessage = (msg: Buffer, remoteInfo: RemoteInfo) => {
  console.log(
    `${new Date().toUTCString()} - ${remoteInfo.address}:${
      remoteInfo.port
    } - ${msg.toString()}`
  )
}

export const createUdpServer = (port: number) => {
  const socket = createSocket('udp4')
  socket.on('message', onMessage)
  socket.bind(port)
  socket.on('listening', () => {
    console.log(`udp server listening on :${port}`)
  })
}
index.ts
import { createUdpServer } from './udp'

createUdpServer(80)
package.json
{
  "name": "typescript-template",
  "version": "1.0.0",
  "description": "",
  "scripts": {
    "build": "tsc",
    "dev": "npx nodemon ./src/index.ts",
    "start": "node ./dist/index.js"
  },
  "devDependencies": {
    "@typescript-eslint/eslint-plugin": "^5.21.0",
    "@typescript-eslint/parser": "^5.21.0",
    "eslint": "^8.14.0",
    "eslint-config-prettier": "^8.5.0",
    "nodemon": "^2.0.15",
    "prettier": "^2.6.2",
    "ts-node": "^10.7.0",
    "typescript": "^4.6.3"
  },
  "dependencies": {}
}
.eslintrc
{
  "parser": "@typescript-eslint/parser",
  "parserOptions": {
    "ecmaVersion": 12,
    "sourceType": "module"
  },
  "plugins": ["@typescript-eslint"],
  "extends": [
    "eslint:recommended",
    "plugin:@typescript-eslint/recommended",
    "prettier"
  ],
  "rules": {
    "@typescript-eslint/no-unused-vars": "error",
    "@typescript-eslint/consistent-type-definitions": ["error", "type"]
  },
  "env": {
    "browser": false,
    "es2021": true
  }
}
.prettierrc
{
  "semi": false,
  "singleQuote": true,
  "arrowParens": "avoid"
}
.tsconfig
{
  "compilerOptions": {
    "outDir": "dist",
    "target": "ES2020",
    "module": "CommonJS",
    "noImplicitAny": true
  },
  "include": ["src"],
  "exclude": ["node_modules"]
}
Kubernetes
In order to deploy the application on EKS, we first need to build and push the Docker image of the UDP application to a Docker image repository. For simplicity, we will use Docker Hub, as it is free and requires no additional configuration beyond authentication.
For that, we will need to create a docker file
FROM node:latest

WORKDIR /app

COPY package*.json ./
RUN npm ci

COPY . .

RUN npm run build

EXPOSE 80

CMD ["npm", "run", "start"]
And we put this in the application folder, named ‘Dockerfile’.
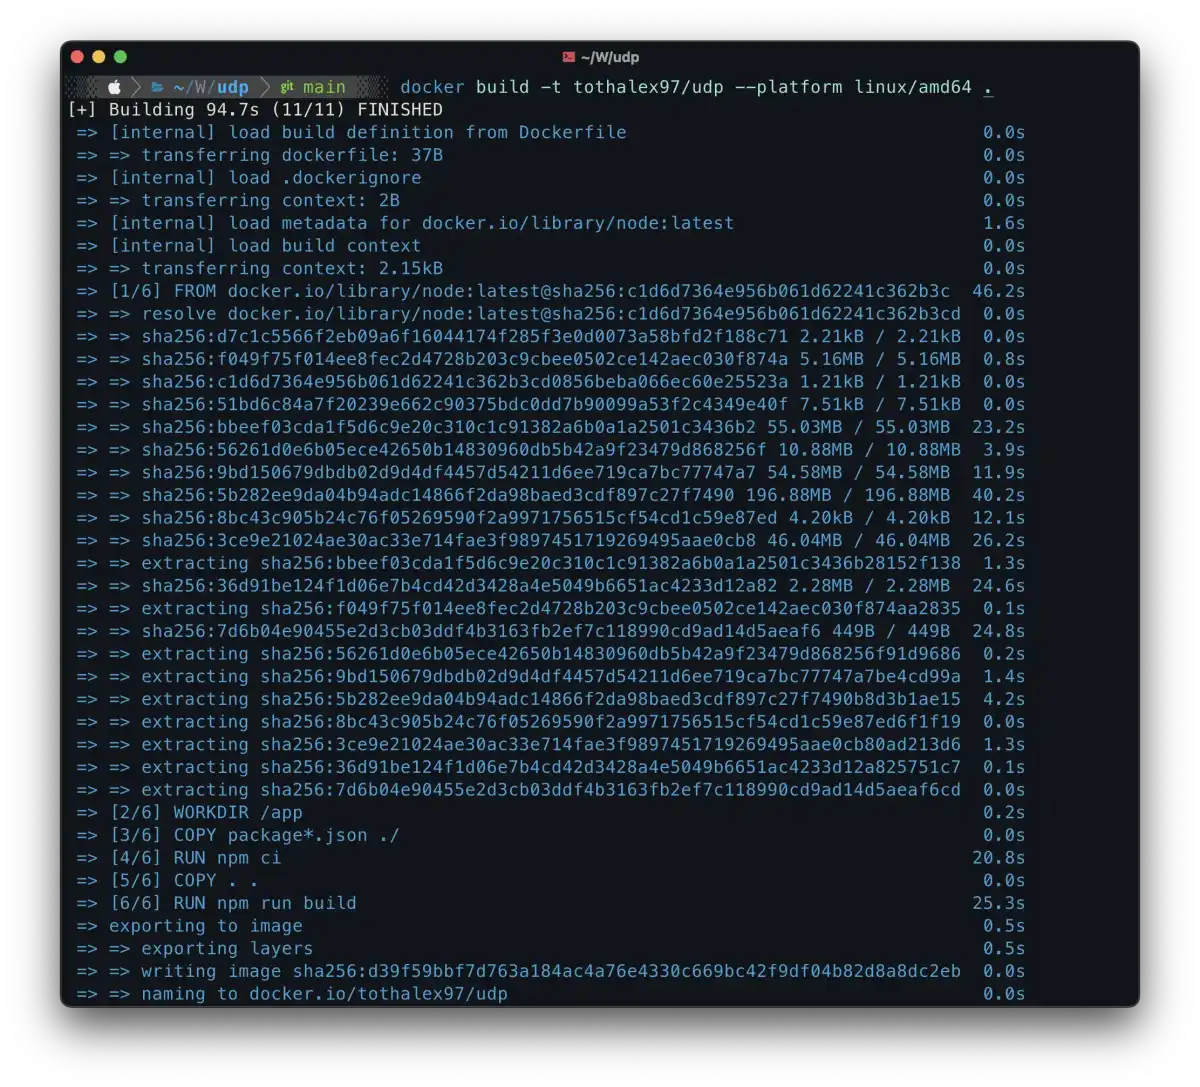
Next, we need to build and push the docker image:
docker build -t <your-username>/udp --platform linux/amd64 .- you need to specify your docker hub username, so the name should look like this
/ - I also need to specify the platform because I’m running a mac m1
docker push <your-username>/udp
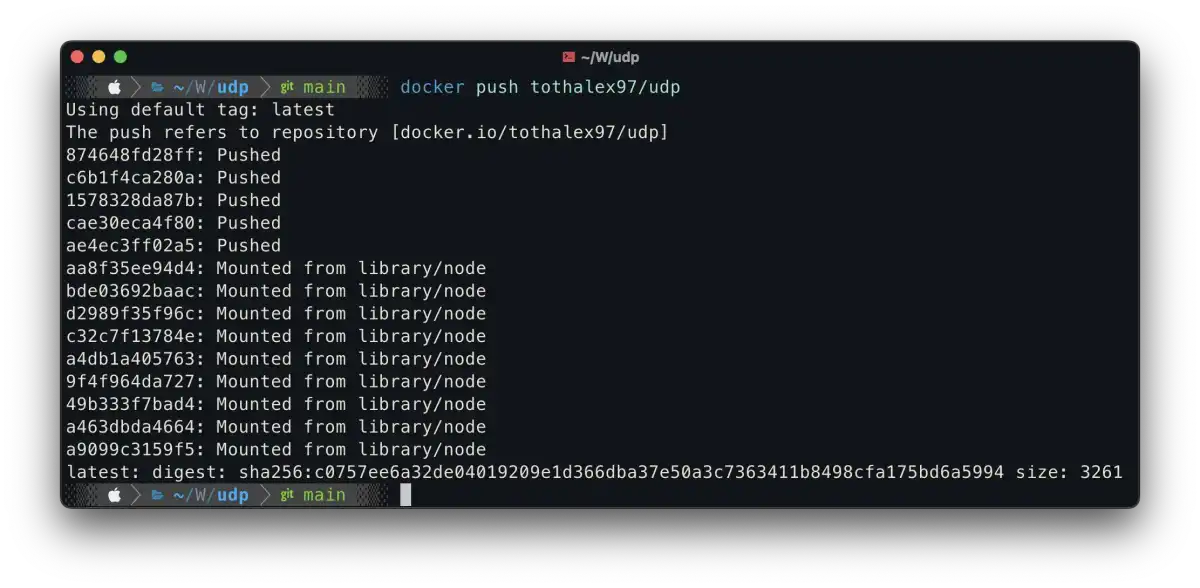
You can also check the image on the docker hub website.
Cluster
Next, we will create our cluster with helm charts(you can also use the helm create command)
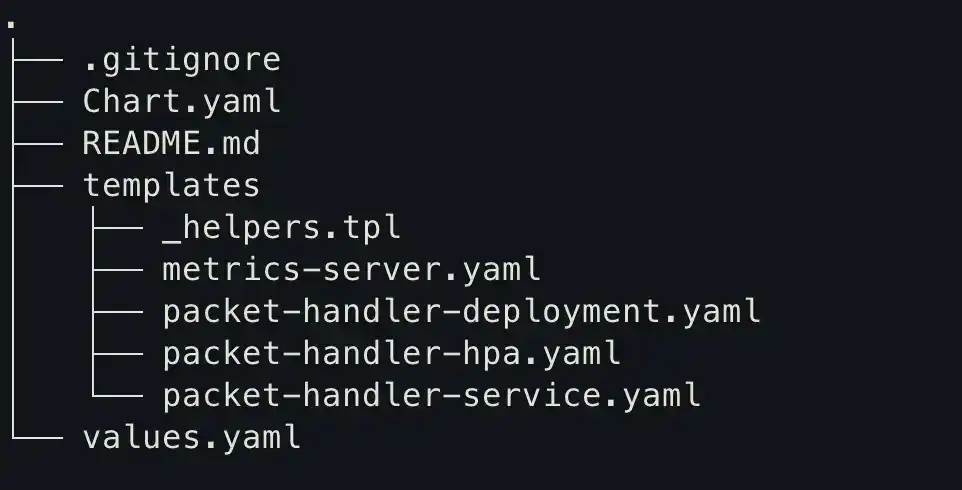
You can find the helm chart repository here.
packet-handler-deployment.yaml
apiVersion: apps/v1
kind: Deployment
metadata:
  name: packet-handler
  labels:
    run: packet-handler
spec:
  replicas: 2
  selector:
    matchLabels:
      run: packet-handler
  template:
    metadata:
      labels:
        run: packet-handler
    spec:
      containers:
        - name: packet-handler
          image: tothalex97/udp
          ports:
            - name: udp
              containerPort: 80
              protocol: UDP
            - name: tcp
              containerPort: 80
              protocol: TCP
            - containerPort: 9000
          readinessProbe:
            httpGet:
              path: /healthz
              port: 9000
            initialDelaySeconds: 30
            periodSeconds: 10
          livenessProbe:
            httpGet:
              path: /healthz
              port: 9000
            initialDelaySeconds: 60
            periodSeconds: 20
          resources:
            limits:
              cpu: 500m
            requests:
              cpu: 200m
There are a few things going on here but the most important are:
- we expose a UDP port, this is the application entry point
- we expose a TCP port, which will be the health check port for the AWS NLB, note: the UDP and the TCP port number are the same, this is allowed
- we expose an HTTP port, which will be the health check port for the Kubernetes cluster
Let’s see how these health check ports will look in the UDP application.
import { createServer } from 'net'

const createTCPServer = () => {
  const server = createServer()

  server.on('connection', (connection) => {
    connection.write('ok')
  })

  return server
}

export { createTCPServer }
Now let’s modify the index.ts file.
import * as express from 'express'
import { json } from 'body-parser'

import { createUdpServer } from './udp'
import { createTCPServer } from './tcp'

createUdpServer(80)
const tcpServer = createTCPServer()
const httpServer = express()

httpServer.use(json())

httpServer.get('/healthz', (_, res) => {
  res.send('ok')
})

httpServer.listen(9000, () => {
  console.log('http server listening on :9000')
  tcpServer.listen(80)
})
Note that I also added an HTTP port. To use this, you will need to install the ‘express’ package:
npm i --save expressFinally, our Dockerfile will look like this:
FROM node:latest
WORKDIR /app
COPY package*.json ./
RUN npm ci
COPY . .
RUN npm run build
EXPOSE 9000
EXPOSE 80/udp
EXPOSE 80/tcp
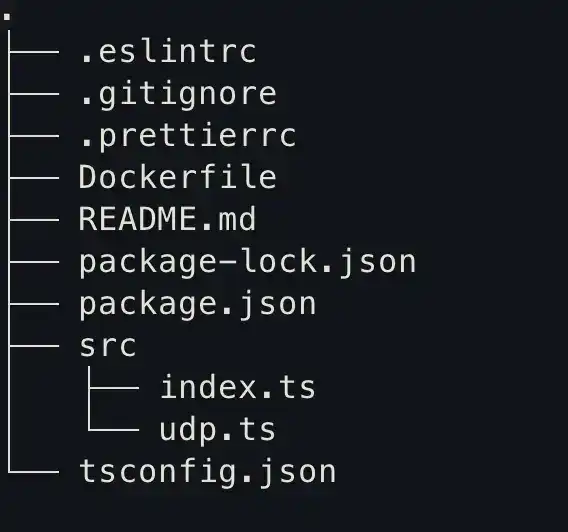
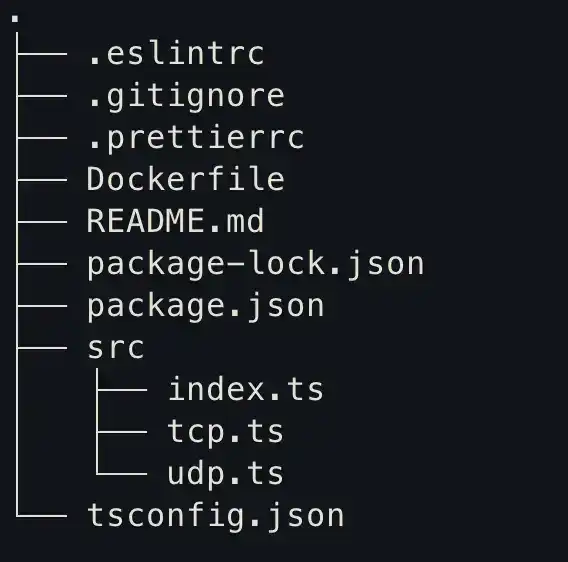
CMD ["npm", "run", "start"]The application’s new structure:
Now it’s important to build and push the docker image again to the hub because we changed the code.
Service
This is the point where we define the Load Balancer and the parameters.
apiVersion: v1
kind: Service
metadata:
  name: packet-handler
  annotations:
    service.beta.kubernetes.io/aws-load-balancer-type: external
    service.beta.kubernetes.io/aws-load-balancer-nlb-target-type: ip
    service.beta.kubernetes.io/aws-load-balancer-scheme: internet-facing
spec:
  type: LoadBalancer
  externalTrafficPolicy: Local
  selector:
    run: packet-handler
  ports:
    - port: 80
      targetPort: 80
      protocol: UDP
name: udp- In my case, the most important thing is to define the ‘aws-load-balancer-nlb-target-type’ to be ‘ip’. The reason for this is that with this solution, we will get the original device source IP and PORT that sent the packet, and not the NLB’s IP and PORT that forwarded the packet to the pod
App autoscaling
For autoscaling, we need two things:
- metrics-server — this will track the CPU/memory usage of the pods
apiVersion: v1
kind: ServiceAccount
metadata:
  labels:
    k8s-app: metrics-server
  name: metrics-server
  namespace: kube-system
---
apiVersion: rbac.authorization.k8s.io/v1
kind: ClusterRole
metadata:
  labels:
    k8s-app: metrics-server
    rbac.authorization.k8s.io/aggregate-to-admin: 'true'
    rbac.authorization.k8s.io/aggregate-to-edit: 'true'
    rbac.authorization.k8s.io/aggregate-to-view: 'true'
  name: system:aggregated-metrics-reader
rules:
  - apiGroups:
      - metrics.k8s.io
    resources:
      - pods
      - nodes
    verbs:
      - get
      - list
      - watch
---
apiVersion: rbac.authorization.k8s.io/v1
kind: ClusterRole
metadata:
  labels:
    k8s-app: metrics-server
  name: system:metrics-server
rules:
  - apiGroups:
      - ''
    resources:
      - nodes/metrics
    verbs:
      - get
  - apiGroups:
      - ''
    resources:
      - pods
      - nodes
    verbs:
      - get
      - list
      - watch
---
apiVersion: rbac.authorization.k8s.io/v1
kind: RoleBinding
metadata:
  labels:
    k8s-app: metrics-server
  name: metrics-server-auth-reader
  namespace: kube-system
roleRef:
  apiGroup: rbac.authorization.k8s.io
  kind: Role
  name: extension-apiserver-authentication-reader
subjects:
  - kind: ServiceAccount
    name: metrics-server
    namespace: kube-system
---
apiVersion: rbac.authorization.k8s.io/v1
kind: ClusterRoleBinding
metadata:
  labels:
    k8s-app: metrics-server
  name: metrics-server:system:auth-delegator
roleRef:
  apiGroup: rbac.authorization.k8s.io
  kind: ClusterRole
  name: system:auth-delegator
subjects:
  - kind: ServiceAccount
    name: metrics-server
    namespace: kube-system
---
apiVersion: rbac.authorization.k8s.io/v1
kind: ClusterRoleBinding
metadata:
  labels:
    k8s-app: metrics-server
  name: system:metrics-server
roleRef:
  apiGroup: rbac.authorization.k8s.io
  kind: ClusterRole
  name: system:metrics-server
subjects:
  - kind: ServiceAccount
    name: metrics-server
    namespace: kube-system
---
apiVersion: v1
kind: Service
metadata:
  labels:
    k8s-app: metrics-server
  name: metrics-server
  namespace: kube-system
spec:
  ports:
    - name: https
      port: 443
      protocol: TCP
      targetPort: https
  selector:
    k8s-app: metrics-server
---
apiVersion: apps/v1
kind: Deployment
metadata:
  labels:
    k8s-app: metrics-server
  name: metrics-server
  namespace: kube-system
spec:
  selector:
    matchLabels:
      k8s-app: metrics-server
  strategy:
    rollingUpdate:
      maxUnavailable: 0
  template:
    metadata:
      labels:
        k8s-app: metrics-server
    spec:
      containers:
        - args:
            - --cert-dir=/tmp
            - --secure-port=4443
            - --kubelet-preferred-address-types=InternalIP,ExternalIP,Hostname
            - --kubelet-use-node-status-port
            - --metric-resolution=15s
          image: k8s.gcr.io/metrics-server/metrics-server:v0.6.1
          imagePullPolicy: IfNotPresent
          livenessProbe:
            failureThreshold: 3
            httpGet:
              path: /livez
              port: https
              scheme: HTTPS
            periodSeconds: 10
          name: metrics-server
          ports:
            - containerPort: 4443
              name: https
              protocol: TCP
          readinessProbe:
            failureThreshold: 3
            httpGet:
              path: /readyz
              port: https
              scheme: HTTPS
            initialDelaySeconds: 20
            periodSeconds: 10
          resources:
            requests:
              cpu: 100m
              memory: 200Mi
          securityContext:
            allowPrivilegeEscalation: false
            readOnlyRootFilesystem: true
            runAsNonRoot: true
            runAsUser: 1000
          volumeMounts:
            - mountPath: /tmp
              name: tmp-dir
      nodeSelector:
        kubernetes.io/os: linux
      priorityClassName: system-cluster-critical
      serviceAccountName: metrics-server
      volumes:
        - emptyDir: {}
          name: tmp-dir
---
apiVersion: apiregistration.k8s.io/v1
kind: APIService
metadata:
  labels:
    k8s-app: metrics-server
  name: v1beta1.metrics.k8s.io
spec:
  group: metrics.k8s.io
  groupPriorityMinimum: 100
  insecureSkipTLSVerify: true
  service:
    name: metrics-server
    namespace: kube-system
  version: v1beta1
versionPriority: 100- HorizontalPodAutoscaler — this is the configuration object for the deployed application in Kubernetes, here you can define the minimum and maximum scale of the pods
apiVersion: autoscaling/v1
kind: HorizontalPodAutoscaler
metadata:
  name: packet-handler
  namespace: default
spec:
  maxReplicas: 4
  minReplicas: 2
  scaleTargetRef:
    apiVersion: apps/v1
    kind: Deployment
    name: packet-handler
targetCPUUtilizationPercentage: 90- If the pods reach 90% usage, that is when Kubernetes will initiate new pods
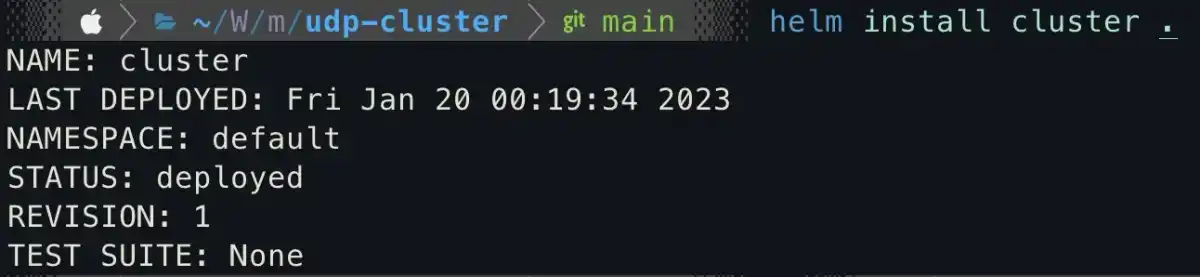
Now let’s run the install command and voilà
helm install cluster .
We can check the installed cluster by running the following command:
kubectl get all
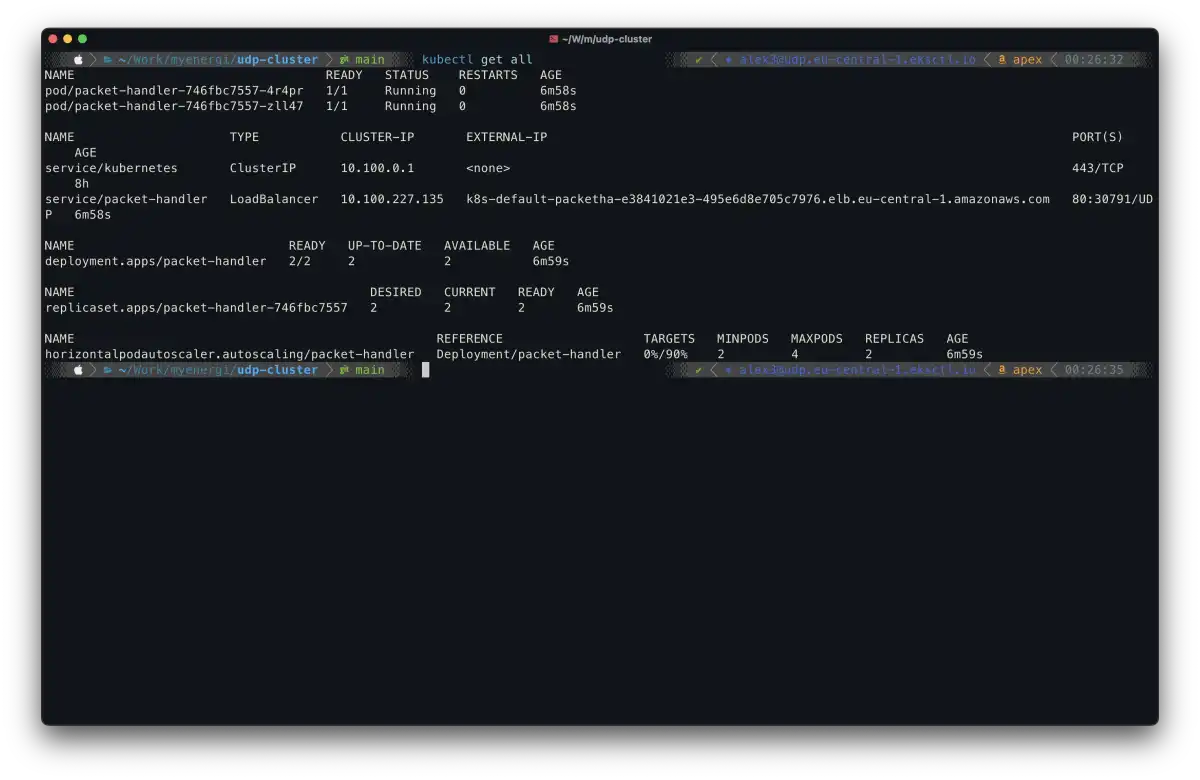
Here you can see we have a LoadBalancer service and two running packet handler pods (we defined a minimum of 2 in the HPA). Note that the LoadBalancer has been assigned an IP address, which serves as the entry point for sending packets.
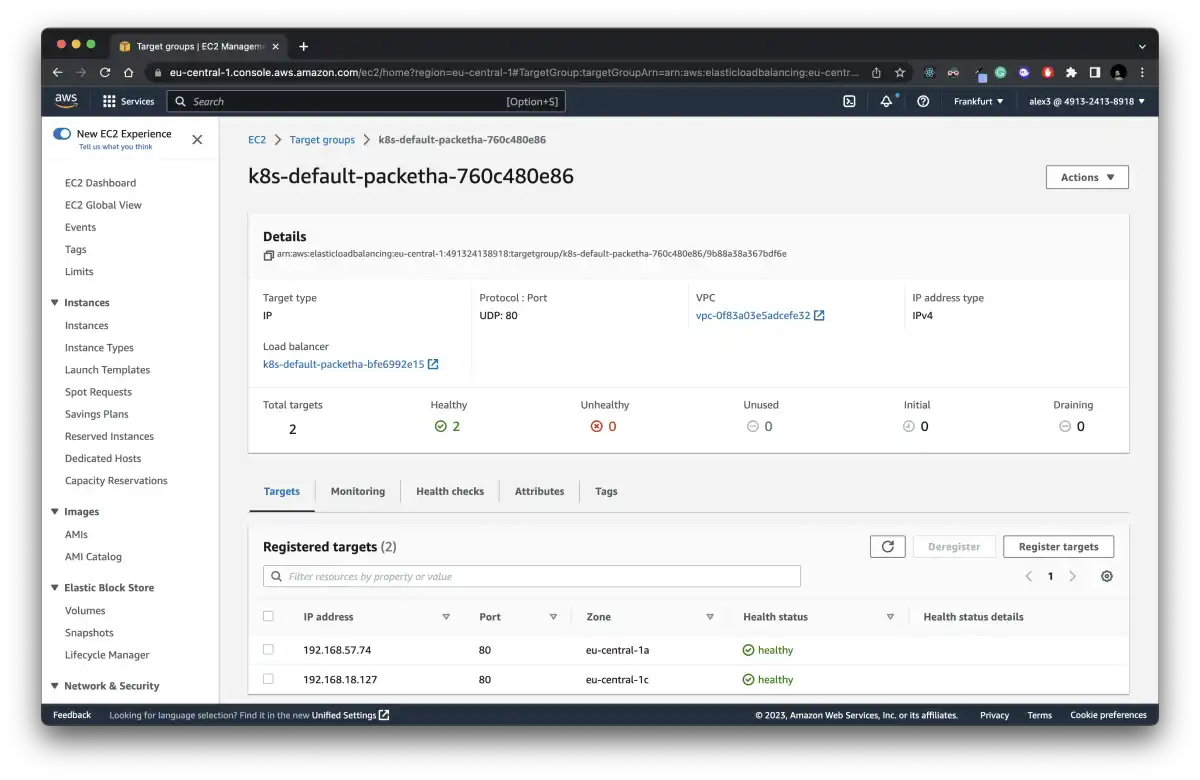
You can also check if the pods are healthy on the AWS, under the EC2 -> Target groups ->
Let’s see in action I will send some udp packets through my super simple udp client:
import { createSocket } from 'dgram'

const socket = createSocket('udp4')

const msg = 'Hello, World!'

socket.send(
  msg,
  80,
  'k8s-default-packetha-bfe6992e15-fd0211df58166544.elb.eu-central-1.amazonaws.com'
)
You can check the logs from the CLI of the pods running the following command:
kubectl logs pod/<name>
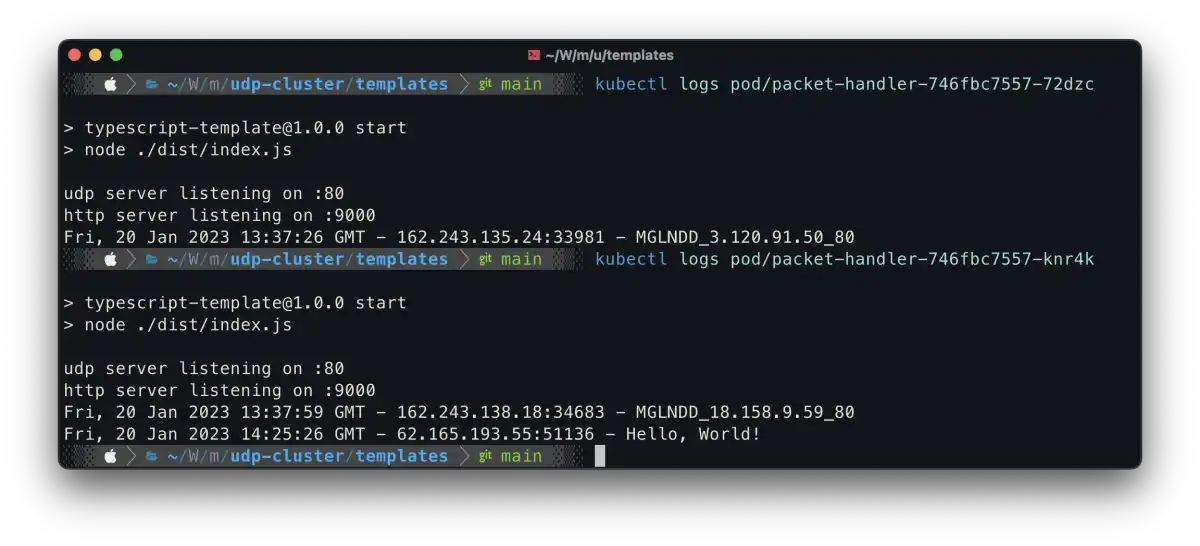
There you have it! Just make sure you check both of them. Don’t panic if you run one time and the packet doesn’t arrive; it’s using UDP, so try multiple times.


Are you interested in working with us?
